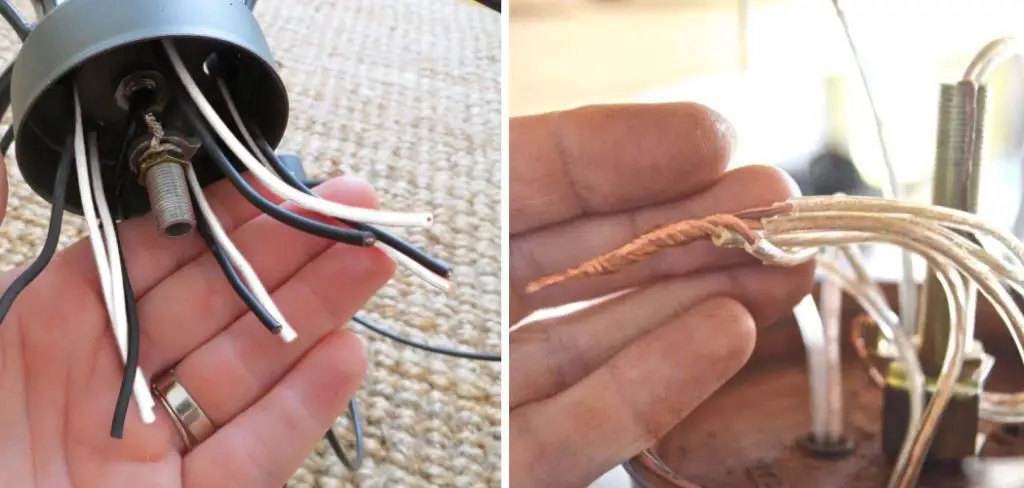
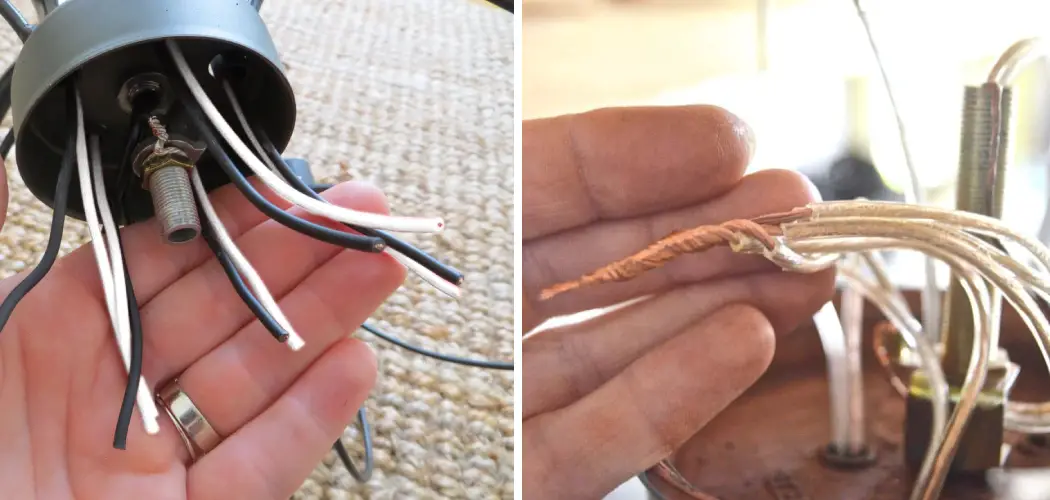
Rewiring a chandelier may seem daunting at first, but it can save you both time and money in the long run. Old wiring can become faulty or unsafe over time, and replacing individual bulbs can get expensive. By learning to rewire a chandelier, you can ensure that your light fixture is always functioning properly without having to hire an electrician.

Rewiring a chandelier may seem like a daunting task, but it can actually be a simple and cost-effective way to update your lighting. By learning to rewire a chandelier, you have the ability to customize the look and function of your light fixture without having to purchase an entirely new one. Read this blog post to learn how to rewire a chandelier.
Step-by-step Instructions for How to Rewire a Chandelier
Step 1: Inspect the Chandelier
Before you begin rewiring the chandelier, it is important to inspect the fixture and identify any areas that need attention. Look for frayed wires, loose connections, or damaged sockets. If you notice any issues, make sure to address them before proceeding with the rewiring.
Step 2: Prepare Your Work Area
It is essential to have a safe and organized work area for rewiring a chandelier. Lay down a clean cloth or tarp to protect your working surface and gather all the necessary tools and materials beforehand. Before starting any electrical work, always disconnect power to the chandelier. Locate the circuit breaker that controls the electricity flow to the fixture and turn it off.

Step 3: Remove the Old Wiring
Carefully remove the old wiring from the chandelier, taking note of which wires are connected to which sockets. Using wire cutters, cut new wires to the appropriate lengths for each socket on the chandelier. Make sure to leave a little extra length in case of any mistakes or adjustments needed.
Step 4: Strip the Wires
Using a wire stripper, remove about half an inch of insulation from the end of each wire. Be careful not to damage the copper strands inside. Using a small screwdriver or needle-nose pliers, connect the new wires to their corresponding sockets on the chandelier. Make sure the connections are tight and secure.
Step 5: Insulate the Connections
To ensure safety, wrap each wire connection with electrical tape. This will prevent any exposed wires from coming into contact with each other or any metal parts of the chandelier. Once all the wiring is complete, reattach the chandelier arms to the main body. Make sure to secure them tightly and evenly.
Now that the rewiring is complete, it’s time to restore power to the chandelier and test your work. If all lights are functioning properly, you have successfully rewired your chandelier!
Safety Precautions for How to Rewire a Chandelier
Rewiring a chandelier may seem like a daunting task, but it is actually quite simple if you follow the right steps and take proper precautions. Here are 7 safety tips to keep in mind when rewiring a chandelier:
- Before starting any work on your chandelier, make sure the power to that part of your home is turned off. This will prevent any potential electrical hazards and keep you safe while working.
- Use a stable ladder or scaffold to reach the chandelier. Avoid standing on chairs or other unstable objects as they can lead to accidents and injuries.
- Always wear protective gear, such as gloves and safety glasses, when handling electrical wires and components. This will protect you from any potential shocks or burns.
- Take a photo of the original wiring before disconnecting it. This will serve as a reference in case you forget how to connect the wires back together later on.
- Use wire cutters/strippers to remove any damaged or old wiring, and replace them with new ones that are of the same gauge and type. This will ensure proper voltage and prevent overheating.
- Secure all wires properly using wire nuts and electrical tape to prevent them from coming loose or touching each other, which can cause a short circuit.
- Once you have completed the rewiring process, turn the power back on and test the chandelier before fully installing it. This will ensure that everything is working properly and minimize any potential hazards.

By following these safety precautions, you can successfully rewire your chandelier without any accidents or mishaps. Remember to always prioritize safety when working with electricity.
Are There Any Common Mistakes to Avoid While Rewiring a Chandelier?
While rewiring a chandelier may seem straightforward, there are some common mistakes that can be easily avoided with proper knowledge and precautions. Here are a few to keep in mind:
- Not Turning off the Power: This cannot be stressed enough – always make sure the power is turned off before starting any work on your chandelier.
- Using Incorrect Wire Gauge: Using wires that are too thin for the voltage can lead to overheating and potential hazards.
- Not Securing Wires Properly: Loose or exposed wires can cause short circuits and electrical shocks. Always make sure to secure them with wire nuts and electrical tape.
- Incorrectly Connecting Wires: It is important to follow the original wiring or refer to a photo when connecting the new wires. Connecting them incorrectly can cause malfunctions or even fires.
By being aware of these common mistakes, you can avoid them and successfully rewire your chandelier with ease. So remember to prioritize safety and double-check your work before turning the power back on.
What Are the Benefits of Rewiring a Chandelier?
Rewiring a chandelier not only ensures safety but also has several other benefits:
- Improved Functionality: Over time, the wiring in a chandelier can become worn and damaged, causing it to malfunction or stop working altogether. Rewiring it can improve its functionality and extend its lifespan.
- Cost-effective: Instead of buying a brand new chandelier, rewiring your existing one can save you money.
- Personalization: Rewiring your chandelier gives you the opportunity to customize it according to your preference, such as adding dimmer switches or different types of bulbs.
- Safety: As mentioned earlier, rewiring a chandelier eliminates potential hazards and ensures the safety of you and your home.
- Learning a New Skill: Rewiring a chandelier may seem daunting, but it is a simple task that can be easily learned and applied to other electrical projects in the future.

Keep these benefits in mind when considering whether or not to rewire your chandelier. So, with the right precautions and knowledge, you can successfully rewire your chandelier and reap its many benefits.
Are There Any Energy-efficient Options for Rewiring a Chandelier?
Yes, there are energy-efficient options available for rewiring a chandelier. These include:
- LED Bulbs: replacing traditional incandescent bulbs with LED bulbs can save energy and reduce electricity bills.
- Dimmer Switches: installing dimmer switches allows you to adjust the brightness of your chandelier according to your needs, thus reducing energy consumption.
- Timer Switches: using timer switches can automatically turn off your chandelier after a set amount of time, reducing unnecessary energy usage.
By incorporating these energy-efficient options when rewiring your chandelier, you can not only save on energy but also contribute to a more sustainable environment. So why not consider making the switch?
Are There Any Additional Maintenance Steps You Should Take After Rewiring a Chandelier?
As with any electrical project, safety should be your top priority. After successfully rewiring a chandelier, it’s important to take a few additional maintenance steps to ensure its continued functionality and safety. Firstly, check all the connections you made during the rewiring process. Make sure they are tight and secure, and there are no loose or exposed wires. This will prevent any potential electrical hazards and ensure that your chandelier functions properly.
Next, inspect the light bulbs. Replace any burnt-out or dimming bulbs to maintain proper lighting in the room. This will also prevent any strain on the wiring and help prolong the life of your newly rewired chandelier.
Lastly, if you notice any flickering lights or strange noises coming from your chandelier, it’s important to address these issues immediately. These could be signs of faulty wiring and should be fixed by a professional electrician to avoid any safety hazards.

Conclusion
In conclusion, rewiring a chandelier is not a task that should be taken lightly. While it may seem like an easy and cost-effective solution, there are several disadvantages to consider before attempting it on your own. Another disadvantage to consider is that rewiring a chandelier requires skill and precision.
If you are not familiar with electrical wiring, it can be challenging to complete the task successfully. Improperly rewiring your chandelier could result in it not functioning correctly or even causing damage to the electrical system in your home.
Lastly, attempting to rewire a chandelier on your own can be time-consuming and frustrating. With all of the intricate wiring and connections involved, it may take you much longer than anticipated to complete the task. This could lead to added stress and frustration, especially if you are not familiar with electrical work. I hope this article has been beneficial for learning how to rewire a chandelier. Make Sure the precautionary measures are followed chronologically.

