Picture this: it’s a chilly December evening, you’re in your cozy sweater, with a cup of hot cocoa in hand, and the magical glow of your Christmas lights winks cheerily at the neighborhood. Who wouldn’t want that perfect holiday vibe? But, alas, the show-stopping display of your dreams can quickly become a holiday nightmare if those stubborn string lights decide to join the Dark Side.
Whether it’s a rogue bulb or, more commonly, a burnt-out fuse being the Grinch, knowing how to change a fuse in Christmas tree lights can be your saving grace. Before embracing your inner electrician, arm yourself with a small screwdriver, replacement fuses, and a dash of patience (and maybe gloves if you’re feeling particularly safety-conscious). Remember, safety first: always unplug your lights before diving into the circuitry. With some quick fixes, you’ll be well on your way to reclaiming your sparkling yuletide joy.
Understanding Fuses in Christmas Lights
What is a Fuse?
Imagine a tiny guardian in your string of Christmas lights, valiantly standing against the onslaught of electrical surges. That tiny hero is the fuse. Its mission? To prevent your lights from burning out faster, you can hum “Jingle Bells.” It interrupts the circuit when the current becomes too much, saving the day from potential overloads and shorts. Without it, your lights might go out with a bang – and not the festive kind!
Signs of a Blown Fuse
You might be excitedly decking the halls when suddenly, bam, your lights go out faster than the holiday cookies disappear. That’s a classic sign of a blown fuse. You might spot other clues too, like the lights flickering more than a skeptical eyebrow at your holiday dance moves. When the whole string gives you the silent treatment, it’s probably time to check the fuses before you blame the dancing.
Types of Fuses
Now, onto fuse varieties – yes, there’s more to this than just “broken” or “not broken.” Most Christmas lights play host to glass tube fuses, neatly tucked inside the plug like a delectable surprise in a holiday pie. Some other setups might have fuse holders, adding extra convenience (and maybe a touch of class) to your troubleshooting endeavors. Knowing which type your lights employ can be the first step to solving any festive fuse fiasco.
Tools and Materials Needed
Essential Tools
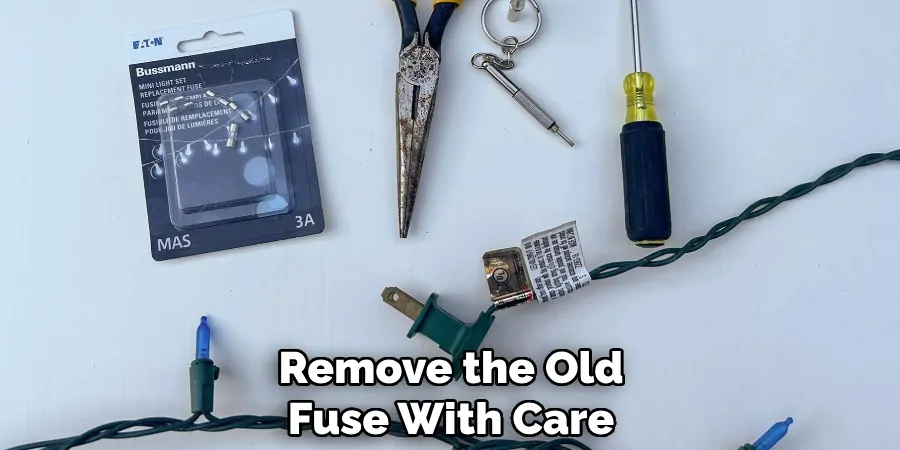
Changing a fuse in your string lights doesn’t require a complete home improvement arsenal, just a few trusty sidekicks: a small screwdriver to wrangle those unruly fuse holders open, wire cutters just in case those pesky wires need a trim, and a multimeter if you’re feeling ambitious enough to test for continuity and join the ranks of seasoned DIY enthusiasts.
Replacement Fuses
Now, about those fuses. Gone are the days of “winging it” with any old fuse lying around. To find the perfect match, check the packaging or the user manual that came with your lights. Those handy resources will guide you to the correct amperage and size, ensuring your replacement fuse is ready to play its part.
Safety Gear
Remember, your hands and eyes are lifelong investments, so gear up. Wear gloves to dodge unwanted zaps and safety glasses to keep your peepers protected.
How to Change a Fuse in Christmas Tree Lights: Step-by-Step Guide
Changing a fuse in your Christmas tree lights is easier than tripping over your untied shoelaces after a night of eggnog. Let’s walk through the steps to bring back that holiday glow:
Step 1: Unplug the Lights
First, ensure the lights are completely unplugged from the outlet. There’s no need to give yourself an unintended holiday surprise in the form of a shocking experience. Safety is your number one priority, so double-check and unplug those twinklers before moving forward.
Step 2: Locate the Fuse Holder
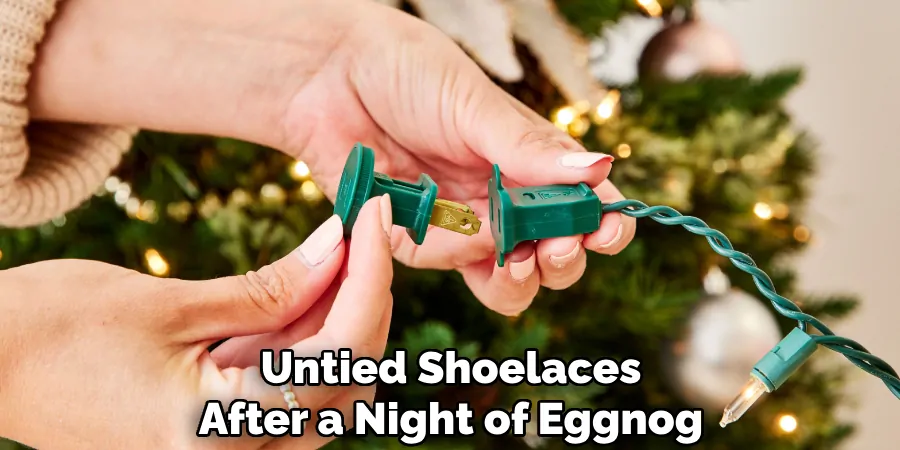
Now, on to locating the fuse holder. This little guardian angel is usually nestled inside the plug of your string lights. It might feel like you’re on a treasure hunt, but don’t worry; follow the cord to the plug where the fuse holder sits, and you’re on the right track.
Step 3: Open the Fuse Holder
Time to open the fuse holder and see what’s inside. Depending on the design, you may need a small screwdriver to pry it open, or if it’s one of those clever sliding types, simply slide the cover off. Approach this with steady hands, not like you’re trying to pop open a soda bottle.
Step 4: Remove the Old Fuse
Remove the old fuse with care. No need to yank it out like you’re trying to pull a stubborn carrot from the garden. Gently check its condition; if it looks burnt or damaged, then it’s time for a replacement.
Step 5: Insert the New Fuse
Ready to introduce the new hero of the night? Insert the replacement fuse, ensuring it fits snugly and securely in the holder. It should sit in there like it’s on vacation, not a wrestling match.
Step 6: Close the Fuse Holder
After ensuring the new fuse is comfortably seated, close up the holder and seal it properly to keep out moisture. Secure the lid with care like you’re tucking in a sleepy toddler, not wrestling with Tupperware.
Step 7: Test the Lights
Now that your heroic mission is nearly complete plug in the lights and see if they spring back to life with a festive flair. If they twinkle, you’ve done it! If not, well, you may have another detective adventure ahead to find other culprits. But for now, bask in the glow of your successful fuse replacement!
Safety Tips and Best Practices
Navigating the holiday maze of managing Christmas lights involves a few safety precautions to keep your festivities merry and bright. First, always handle electrical components with dry hands and avoid working near water sources, like sinks or outdoor puddles. Regularly inspect your lights for cracks or frayed wires; it’s better to take a moment now than to risk a shocking surprise later.
Aim to switch your dazzling displays off when you leave the house or hit the hay because, as captivating as they are, lights left unchecked might decide to throw their own unsanctioned party. Additionally, avoid overloading outlets or linking too many strands together: think cozy reading circle, not sardine can. If you’re using extension cords, ensure they are sturdy and suitable for outdoor or indoor use as needed. Remember, following these tips will keep you safely basking in the glow of your holiday cheer!
Troubleshooting Common Issues
If Lights Still Don’t Work
So, you’ve changed the fuse, and still nada? Don’t worry; troubleshooting your Christmas lights is just as much a holiday tradition as decorating the tree! First, double-check the other fuses in your light string. Some sets have multiple fuses, and both need to be intact for that festive sparkle.
Next, consider whether there are any broader electrical issues. Plug another electronic device into the same outlet to verify its operationality. If the outlet has gone on holiday, maybe it’s time to reset your circuit breaker or check any GFCI outlets for tripped buttons.
Testing for Continuity
Feeling adventurous? Bust out that multimeter to test for continuity. Set it to the lowest setting and test the circuit. Place one probe at one end of the wire and the other probe at the opposite end. If the multimeter beeps, you’re in business; the circuit is intact. No beep? You might have a break in the wire or a bad bulb causing the holdup.
Identifying Other Faulty Components
Go Sherlock on your string lights and inspect each bulb. Look for any discolored, loose, or broken bulbs and replace them if needed. Also, inspect the wiring for frays or kinks that indicate broken connectivity. If you’re up for it, gently wiggle the bulbs to ensure they connect securely. Remember, just like roasting chestnuts, patience and thoroughness are key here!
Conclusion
Understanding “how to change a fuse in Christmas tree lights” is crucial for maintaining a cheerful and safe holiday ambiance. Regular maintenance of your lights ensures a hassle-free, glittering display that everyone can enjoy. Taking proactive measures, like inspecting fuses and learning basic troubleshooting techniques, can prevent unnecessary hiccups in your festive setup.
Remember, the satisfaction of resolving common issues is part of the holiday magic. By mastering these skills, you’ll keep your home beautifully lit and share in the joy and triumph of hands-on problem-solving this season. Celebrate with confidence and let your holiday lights shine brightly!

